
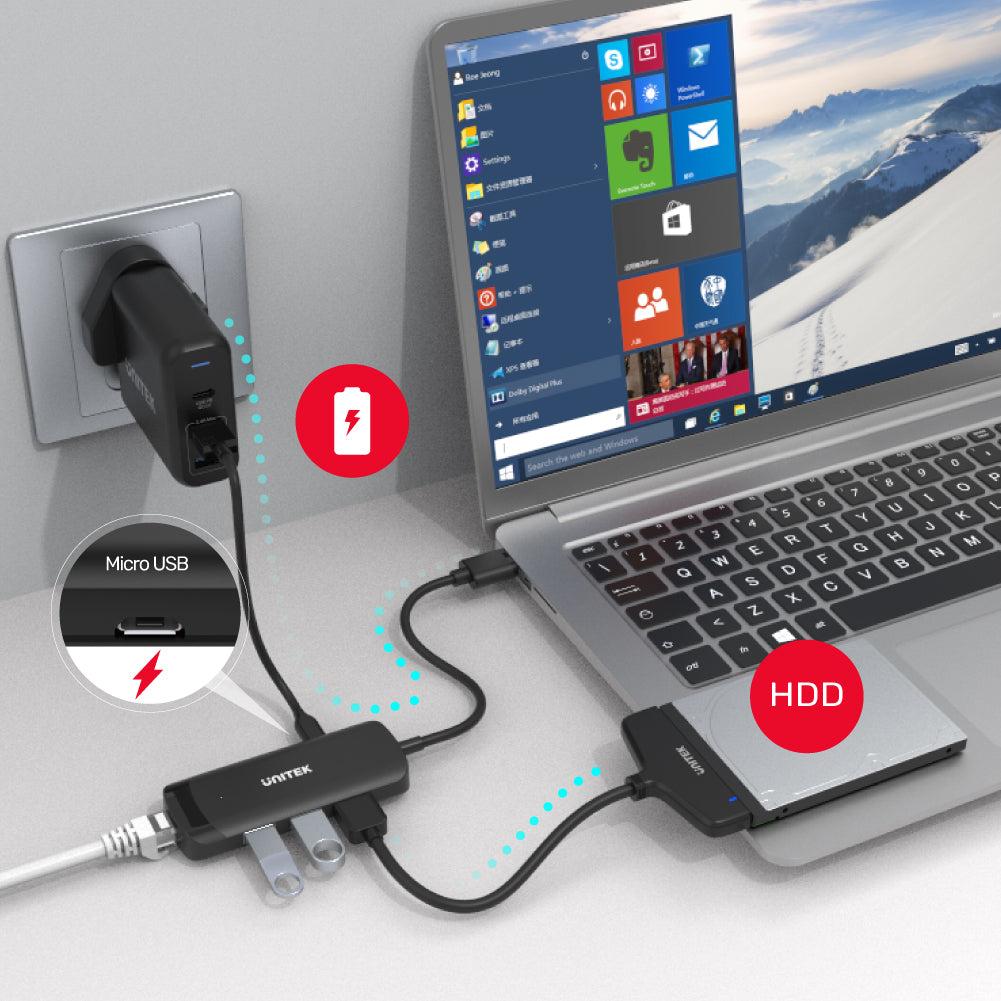


uHUB Q4+ 4-in-1 Powered USB 3.0 Ethernet Hub
- Optional external power via Micro USB
- BC1.2 power output
- 3-Port USB expansion with USB3.0 5Gbps SuperSpeed
- Gigabit Ethernet
This uHUB is a USB hub that combines 3 ports USB expansion over USB3.0 SuperSpeed plus a Gigabit Ethernet RJ45, offers you the efficient performance by the new generation chipset.
- Perfect combination with USB3.0 and Gigabit Ethernet.
- USB3.0 SuperSpeed data transfer (5Gbps), backward compatible with USB2.0/1.1.
- With an optional power port (Micro USB). By connecting to an external power supply, can supply power to peripheral devices.
- Designed and manufactured with BC1.2 charging technology.
- Gigabit Ethernet compatible with full 10/100/1000 Mbps supports IPv4/IPv6 network, full-duplex, automatic flip and flow control, provides a fast and stable internet connection.
- Supports power management, remote wake-up function and Gigabit network power automatic adjustment.
- LED indicator light - indicates the status of the Ethernet connection.
- Plug and play, without complicated driver installation.
- Material: Environmental-friendly ABS Housing
- Color: Black
- Chip: RTS5414C & RTL8153B
- Upstream: USB-A Male
- Downstream: USB-A x3, Gigabit Ethernet RJ45
- Power Input: Micro USB5V 1-3A
- Power Output: BC1.2 5V1.5A
- Dimension: 96mm x 39mm x 14.8mm
Shipping cost will be calculated during checkout. International duties & taxes may apply and are not calculated at checkout.
Shipping & Delivery
For shipping quotes, "Checkout" the item you want to buy, enter your shipping details and the shipping rates will automatically generate based on the item's weight and the delivery location.
If the shipping rates do not generate, please contact us.
Normal Shipping Times: 3-14 business days
The final shipping days depend on local logistics and transportation times.
Delays:
Unitek is not responsible for delays in shipping caused by extraneous factors (such as incorrect addresses, weather, inspections, labor disputes, and/or transportation problems). We cannot be responsible for lost or damaged packages.
Duties & Taxes:
When customs clearance is required for cross-border shipments, any import taxes, customs duties, fees, or VAT (Value Added Tax) imposed by the receiving area are the responsibility of the recipient.
These charges are beyond Unitek's control, and we cannot predict their amount. You are responsible for paying any such additional costs and for complying with the laws and regulations applicable to your country of residence.
If you refuse to pay the applicable charges upon arrival, the goods may be returned to us at your expense.
In such cases, you will receive a refund for the product value paid, minus return shipping costs. Initial shipping fees are non-refundable. If return shipping costs exceed the product value, no refund or return will be processed. For more information, please contact your local customs office.
Global Shipping Notes:
China and Taiwan: Customers in China are required to email a copy of their Resident ID or passport after order confirmation
Korea: Please use your Korean name (not in English) and include your Personal Customs Code.
South Africa: Provide your ID number.
Brazil: Provide your CPF tax number.
Chile: Provide your RUT number.
Turkey: Provide your Turkish ID number.
For any other questions or inquiries, please contact us.
Please download the latest driver of this product. Reinstall the driver again (https://www.unitek-products.com/pages/drivers-hub) and if it still doesn't work, contact us via support@unitek-products.com
Go through the following:
1. Press the Windows Key plus R, type "devmgmt.msc", and press Enter.
2. In Device Manager, under the appropriate heading, confirm that your expansion card is listed and that there isn't an exclamation mark next to it. For example, a USB controller card would be under Universal Serial Bus controllers.
3. Your USB device is listed according to the name of the chipset or the dedicated name.
Go through the following:
1. Click the Apple icon.
2. Click About This Mac.
3. Click More Info or System Report.
4. Under the appropriate heading, please check that your USB device is listed (according to the name of the chipset or the dedicated name) and that there isn't an error. For example, a network card would be under Ethernet Cards.
5. You may have to refresh the System Information page after you plug in your device. To do so, press Command + R with the System Information page open.
If you disconnect a power input from the multiport USB hub during the transmission of the files to or from an attached storage device, it will stop the transmission and may cause file corruption. It is also possible that there will be a loss of function if the power input is removed from the USB hub while it is in operation.
It is important to always follow the disconnection steps listed following:
1. Complete all data transfers over USB to and from the attached storage device.
2. Disconnect the USB hub from the host computer.
3. Disconnect your power input from the USB hub.
4. Eject your attached storage device.
It is best to set a specific speed at half or full duplex in your settings, while the device that the adapter is connected to (whether it is a router, switch, or computer) must also be able to perform at the same speed.
Note: You must log in as the local administrator before you continue.
To do so, go through the following:
1. Press Windows Key plus R.
2. Type "devmgmt.msc".
3. Click OK.
4. Open the Networking adapters section.
5. Right-click the network adapter that you want to change and select 6. Properties.
7. Click the Advanced tab.
8. Scroll down to Speed & Duplex. By default, it is set to Auto-Negotiate. Select any of the speeds that you see in the list.
9. Click OK and restart your computer.
Go through the following:
Windows 10
1. Press the Windows Key plus X.
2. Click Network Connections.
3. Right-click the connection that you want to change and click Properties.
Note: The IP address for a wired connection is called Local Area Connection or Ethernet. The IP address for a wireless connection is called Wireless Network Connection or Wireless.
4. Left-click Internet Protocol Version (TCP/IPv4) and click Properties.
5. Select the Use the following IP address option.
6. Enter your desired IP address and click in the Subnet Mask area, which should auto-complete.
7. Click OK twice to apply the settings.
Note: If you are changing your IP address to access a specific device, minimize the Network Connections window. Please be reminded, in step 7, select Obtain an IP address automatically to access the Internet again.
Windows 8
1. Press the Windows Key plus X.
2. Click Control Panel.
3. Click Network and Sharing Center.
4. Click Change adapter settings on the left.
5. Right-click the connection you want to change and choose Properties.
Note: If you are changing the IP address on a physical connection, it will be called “Local Area Connection” or “Ethernet”. If you are changing the IP address on a wireless connection, it will be called “Wireless Network Connection” or “Wireless”.
6. Left-click “Internet Protocol Version (TCP/IPv4)” to select, then click Properties.
7. Select the radio button "Use the following IP address".
8. Enter your desired IP address and click into the Subnet Mask area, which should auto-fill appropriately.
9. Click OK twice to apply the settings.
Note: If you are changing your IP address to access a specific device, minimize the Network Connections window. Please be reminded, in step 7, select Obtain an IP address automatically to access the Internet again.
Windows 7
1. Click Start, then select Control Panel.
2. Click Network and Internet.
3. Click Network and Sharing Center.
4. Click Change adapter settings on the left.
5. Right-click the connection you want to change and choose Properties.
Note: If you are changing the IP address on a physical connection, it will be called “Local Area Connection”. If you are changing the IP address on a wireless connection, it will be called “Wireless Network Connection”.
6. Left-click “Internet Protocol Version 4 (TCP/IPv4)” to select it, then click Properties.
7. Select the radio button "Use the following IP address".
8. Enter your desired IP address and click into the Subnet Mask area, which should auto-fill appropriately.
9. Click OK twice to apply the settings.
Note: If you are changing your IP address to access a specific device, minimize the Network Connections window. Please be reminded, in step 7, select Obtain an IP address automatically to access the Internet again.
Windows Vista
1. Click Start, then select Control Panel.
2. Click Network and Sharing Center.
3. Click Manage network connections on the left.
4. Right-click the connection you want to change and choose Properties.
Note: If you are changing the IP address on a physical connection, it will be called “Local Area Connection”. If you are changing the IP address on a wireless connection, it will be called “Wireless Network Connection”.
5. Left-click “Internet Protocol Version (TCP/IPv4)” to select it, then click Properties.
6. Select the radio button "Use the following IP address".
7. Enter your desired IP address and click into the Subnet Mask area, which should auto-fill appropriately.
8. Click OK twice to apply the settings.
Note: If you are changing your IP address to access a specific device, minimize the Network Connections window. Please be reminded, in step 6, select Obtain an IP address automatically to access the Internet again.
Windows XP
1. Click Start, then select Control Panel.
2. Click Network Connections.
3. Right-click the connection you want to change and choose Properties.
Note: If you are changing the IP address on a physical connection, it will be called “Local Area Connection”. If you are changing the IP address on a wireless connection, it will be called “Wireless Network Connection”.
4. In the middle of the Properties window, scroll down to "Internet Protocol (TCP/IP)" and left-click on it to select it, then click Properties.
5. Select the radio button "Use the following IP address".
6. Enter your desired IP address and click into the Subnet Mask area, which should auto-fill appropriately.
7. Click OK twice to apply the settings.
Note: If you are changing your IP address to access a specific device, minimize the Network Connections window. Please be reminded, in step 5, select Obtain an IP address automatically to access the Internet again.
Mac OS
1. Click the Apple menu.
2. Click System Preferences.
3. Click Network.
4. Select the network device that you would like to configure.
Note: The IP address for a wired connection is called Local Area Connection or Ethernet. The IP address for a wireless connection is called Wireless Network Connection or Wi-Fi.
5. Click Advanced.
6. Click TCP/IP.
7. Beside Configure IPv4, select Manually.
8. In the IPv4 Address field, enter your desired IP address.
9. In the Subnet Mask field, enter a default subnet address (for example, 255.255.255.0 for 192.168.xxx.xxx).
10. Do one of the following:
.Leave the Router field blank.
.Enter the IP address of the default gateway.
11. Click OK and Apply to apply the changes.
Note: If you are changing your IP address to access a specific device, minimize the Network window. Please be reminded, in step 7, select Using DHCP to access the Internet again.