
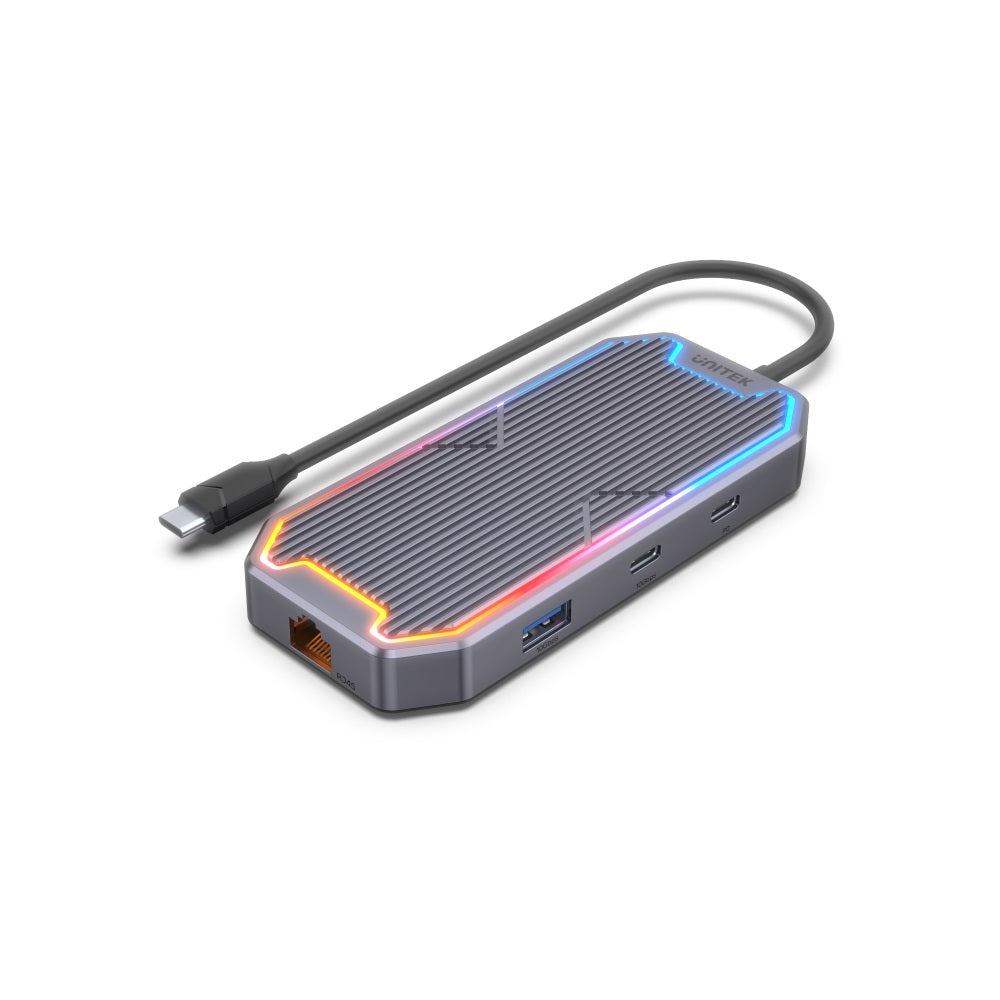
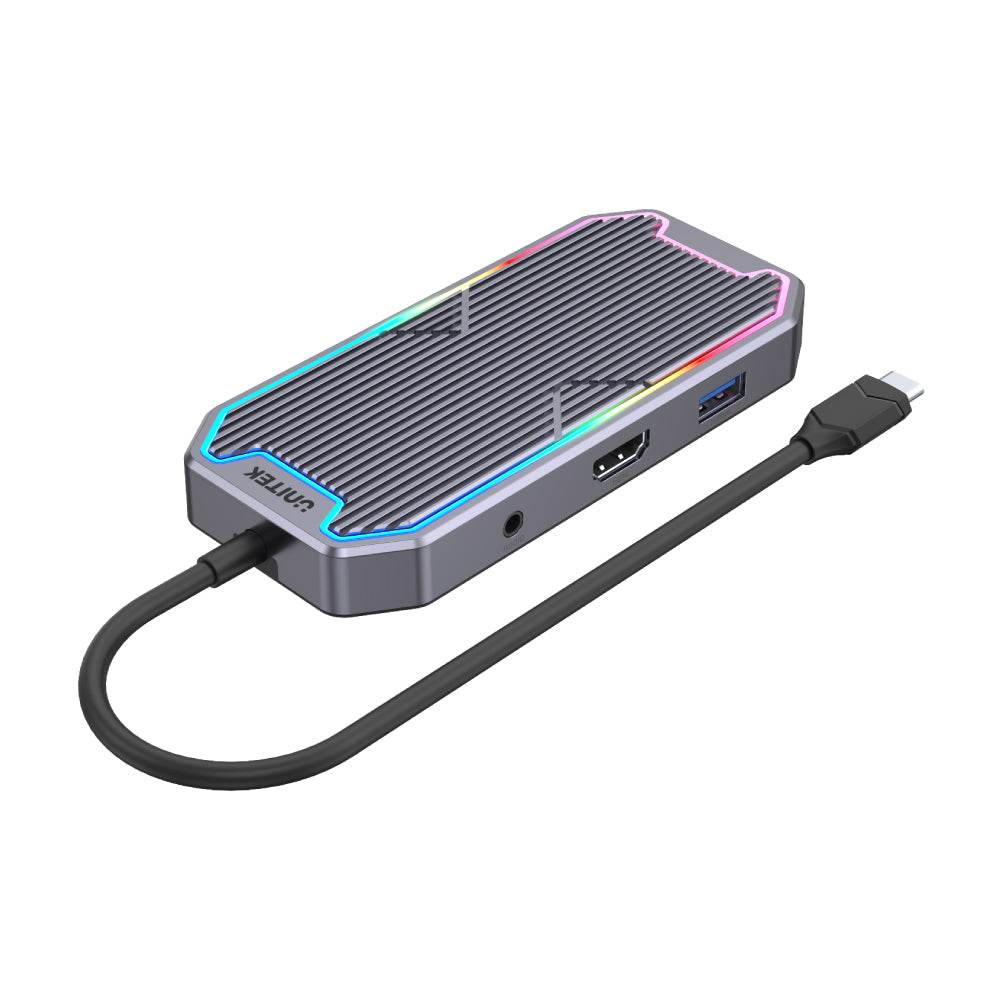


uHUB S7+ 7-in-1 USB-C ハブ、10Gbps データ、HDMI、PD 100W 搭載
This uHUB is a USB hub with RGB dynamic LED, combines 3 ports USB (one USB-C and dual USB-A) expansion over USB3.2 Gen2 SuperSpeed plus 4K 60Hz ultra HD HDMI 2.0, USB-C 100W 20V/5A PD and Gigabit Ethernet. Aluminium-alloy casing in mechanic design plus the dynamic RGB offers this hub the science fiction style.

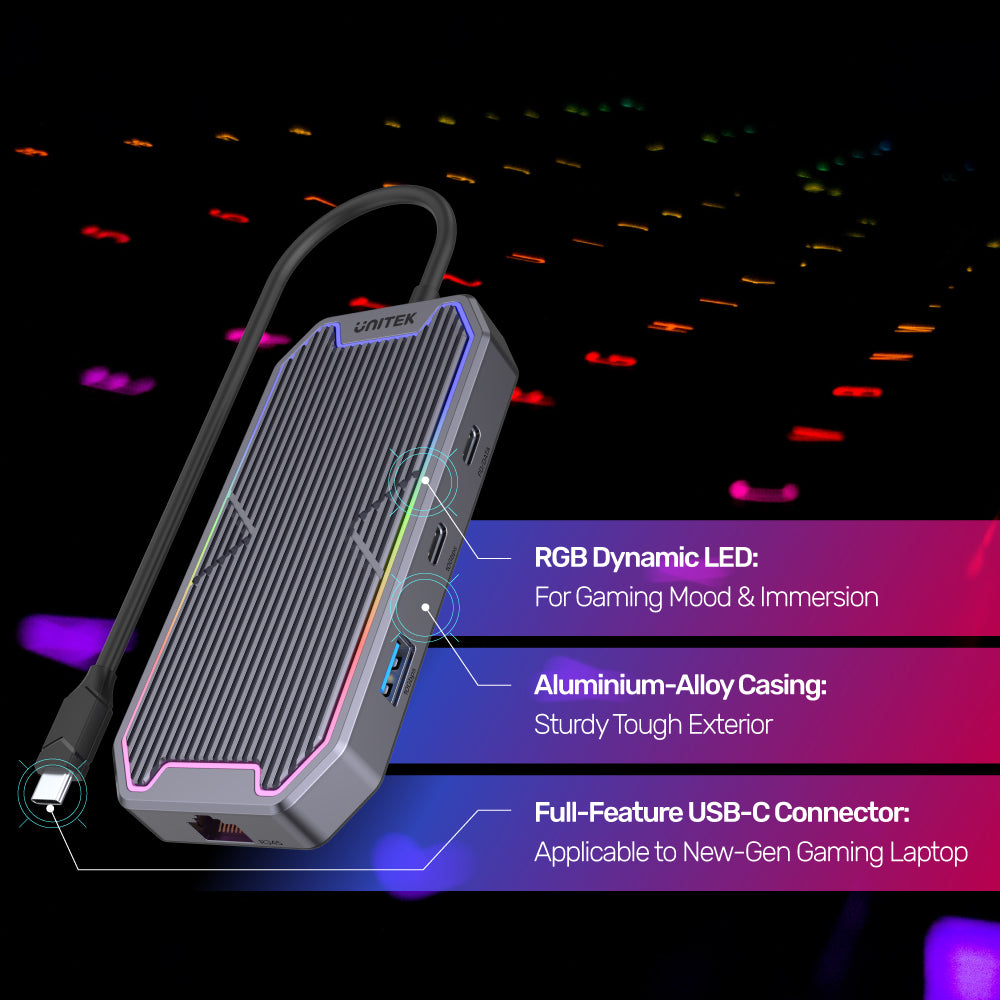
Sci-fi Mechanic Design
Unleash advanced features with our USB-C 7-in-1 RGB gaming hub, meticulously designed to meet all your gaming needs. Enjoy the dynamic RGB LED lighting that enhances your gaming mood and immersion. The sturdy aluminium-alloy casing ensures durability, while the full-feature USB-C connector is perfect for new-generation gaming laptops. Elevate your gaming experience with stylish innovation!

18Gbps Bandwidth @HDMI 2.0
Experience unparalleled display capabilities with our HDMI 2.0 support, offering an incredible bandwidth of 18Gbps. Enjoy external displays at 4K@60Hz, 1440@144Hz, or 1080P@240Hz, all designed to meet your gaming requirements. With support for HDR and HDCP 2.3/1.4, you can trust that this technology will deliver stunning visuals and a premium viewing experience. Get ready to elevate your gaming and multimedia adventures!

Hi-Res Audio I/O
Experience exceptional sound quality with support for up to 384kHz 24bit DAC/ADC for high-resolution communication and audio enjoyment. Featuring a 3.5mm interface, this device adopts a 4-pole design that allows for both audio output and microphone input, prioritizing audio clarity over HDMI. Immerse yourself in high-fidelity sound and elevate your listening experience to new heights!

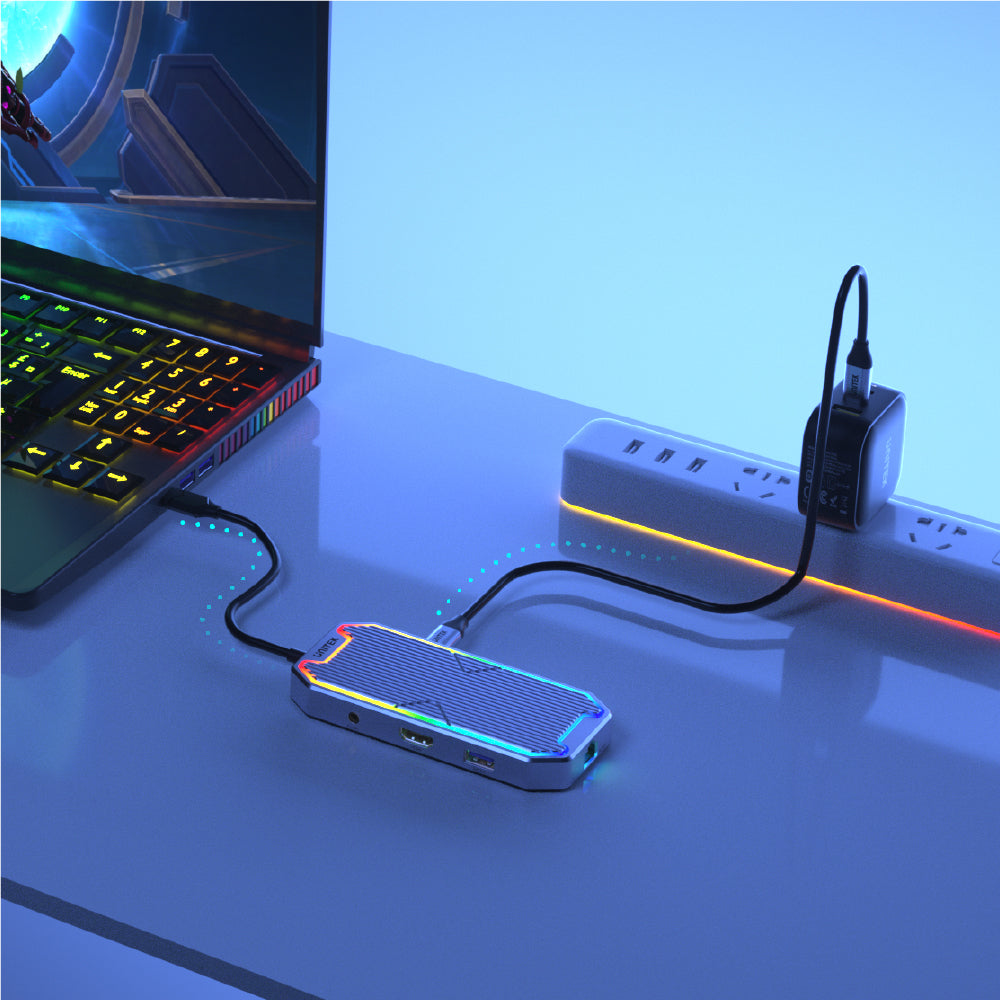
100W Power Delivery Forceful Charging
Effortlessly power your devices with our advanced USB-C Power Delivery feature, capable of delivering up to 100W (20V/5A) charging to your laptop. This technology automatically meets the maximum charging requirements, ensuring your upstream device stays powered. The additional USB-C port allows for fast charging, with actual power output dependent on your power adapter. Stay charged and keep your productivity on track!

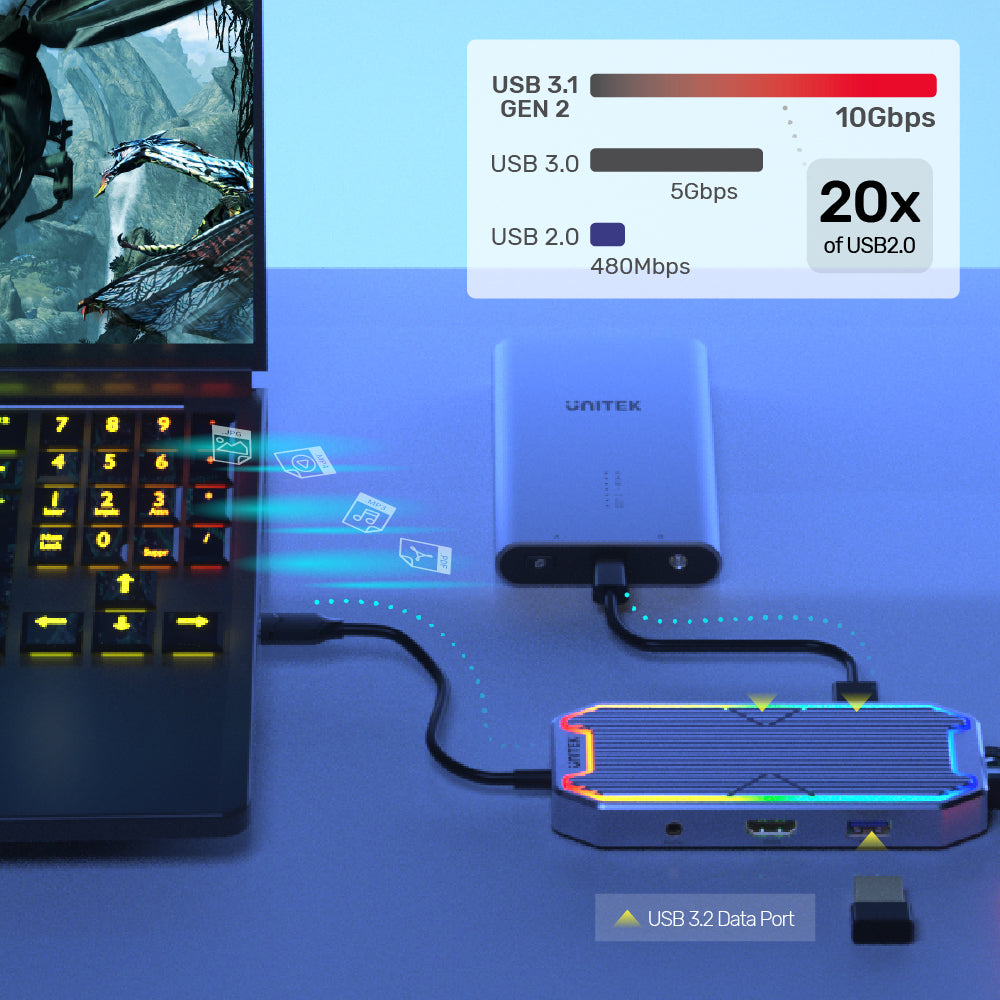
USB 3.2 Gen2 SuperSpeed Data
Equip yourself with three high-speed ports featuring USB 3.2 Gen2 SuperSpeed, providing data transfer rates of up to 10Gbps. Effortlessly transfer large files like HD movies in seconds using the dedicated USB-C and dual USB-A data ports. Backward compatible with USB 3.0, 2.0, and 1.1, this hub ensures seamless connectivity and outstanding performance for all your devices!

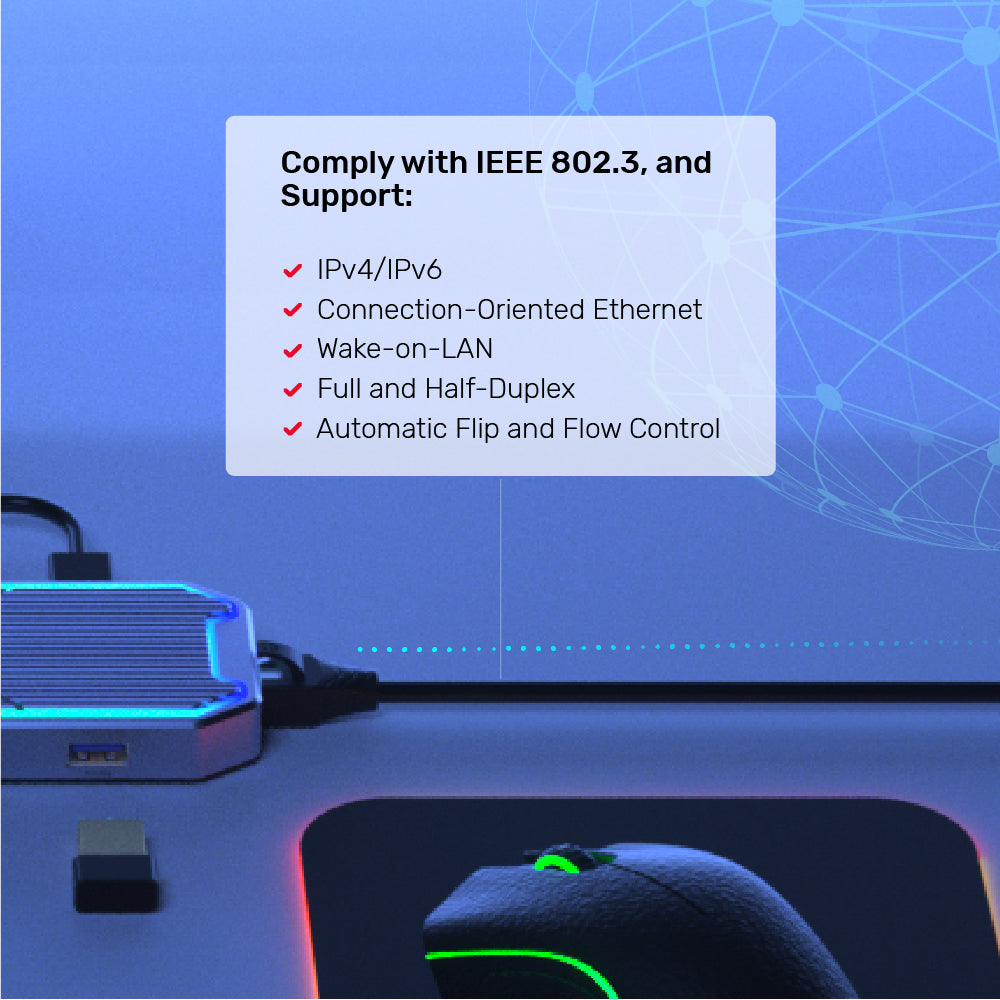
Reliable Gigabit Ethernet
Enjoy a wired, stable, and fast internet connection with our Gigabit Ethernet, providing unrivaled clarity for streaming media. Fully compliant with IEEE 802.3 standards, this connection supports speeds of 10/100/1000 Mbps and is compatible with both IPv4 and IPv6. Additional features include Wake-on-LAN, full and half-duplex, automatic flip, and flow control, ensuring a seamless online experience!
This uHUB is a USB hub with RGB dynamic LED, combines 3 ports USB (one USB-C and dual USB-A) expansion over USB3.2 Gen2 SuperSpeed plus 4K 60Hz ultra HD HDMI 2.0, USB-C 100W 20V/5A PD and Gigabit Ethernet. Aluminium-alloy casing in mechanic design plus the dynamic RGB offers this hub the science fiction style.
Sci-fi Mechanic Design
Unleash advanced features with our USB-C 7-in-1 RGB gaming hub, meticulously designed to meet all your gaming needs. Enjoy the dynamic RGB LED lighting that enhances your gaming mood and immersion. The sturdy aluminium-alloy casing ensures durability, while the full-feature USB-C connector is perfect for new-generation gaming laptops. Elevate your gaming experience with stylish innovation!
18Gbps Bandwidth @HDMI 2.0
Experience unparalleled display capabilities with our HDMI 2.0 support, offering an incredible bandwidth of 18Gbps. Enjoy external displays at 4K@60Hz, 1440@144Hz, or 1080P@240Hz, all designed to meet your gaming requirements. With support for HDR and HDCP 2.3/1.4, you can trust that this technology will deliver stunning visuals and a premium viewing experience. Get ready to elevate your gaming and multimedia adventures!
Hi-Res Audio I/O
Experience exceptional sound quality with support for up to 384kHz 24bit DAC/ADC for high-resolution communication and audio enjoyment. Featuring a 3.5mm interface, this device adopts a 4-pole design that allows for both audio output and microphone input, prioritizing audio clarity over HDMI. Immerse yourself in high-fidelity sound and elevate your listening experience to new heights!
100W Power Delivery Forceful Charging
Effortlessly power your devices with our advanced USB-C Power Delivery feature, capable of delivering up to 100W (20V/5A) charging to your laptop. This technology automatically meets the maximum charging requirements, ensuring your upstream device stays powered. The additional USB-C port allows for fast charging, with actual power output dependent on your power adapter. Stay charged and keep your productivity on track!
USB 3.2 Gen2 SuperSpeed Data
Equip yourself with three high-speed ports featuring USB 3.2 Gen2 SuperSpeed, providing data transfer rates of up to 10Gbps. Effortlessly transfer large files like HD movies in seconds using the dedicated USB-C and dual USB-A data ports. Backward compatible with USB 3.0, 2.0, and 1.1, this hub ensures seamless connectivity and outstanding performance for all your devices!
Reliable Gigabit Ethernet
Enjoy a wired, stable, and fast internet connection with our Gigabit Ethernet, providing unrivaled clarity for streaming media. Fully compliant with IEEE 802.3 standards, this connection supports speeds of 10/100/1000 Mbps and is compatible with both IPv4 and IPv6. Additional features include Wake-on-LAN, full and half-duplex, automatic flip, and flow control, ensuring a seamless online experience!
| Works With | Windows 7/8/10/11 (32/64bit), Linux kernel 3.x, Mac OS 10.6 or above |
|---|---|
| Host Port Compatibility | USB-C |
| Max Output Resolution | 4K@60Hz |
| HDMI | 1 |
| USB-A | 2 x 10Gbps |
| USB-C | 1 x 10Gbps、1 x PD 100W |
| 3.5mm Aux jack | 1(オーディオ入力/出力) |
| Ethernet RJ45 Jack | 1000MHz |
| Cable Length | 30cm |
| Power Supply | 20V5A |
| Power Source | USB-C |
| Dimensions | 126.0mm x 57.0mm x 18.0mm |
| Material | Aluminum Alloy |
| Colour | Space Grey |
- uHUB 7+ 1 台
- ユーザーマニュアル x 1
オプションを選択