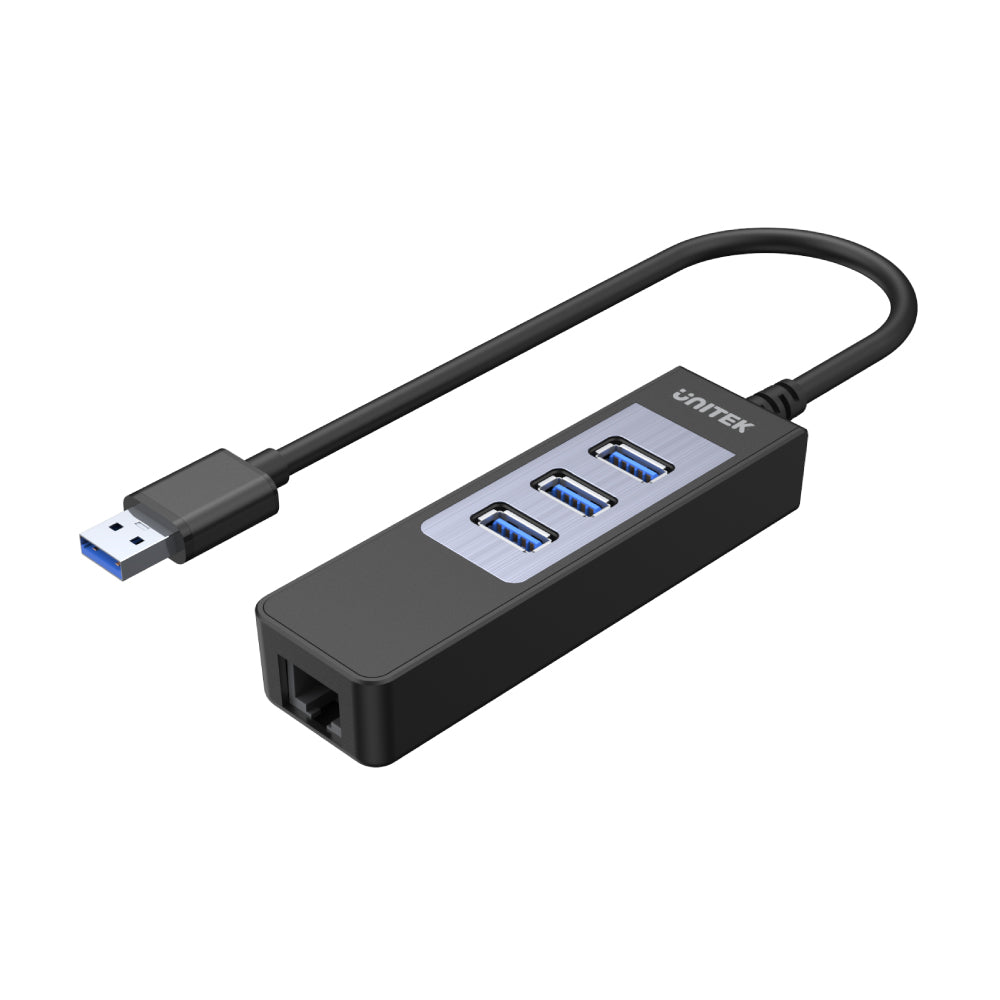


4-in-1 USB 3.0 イーサネット ハブ
製品の特徴:
- USBポート拡張に最適なソリューション。
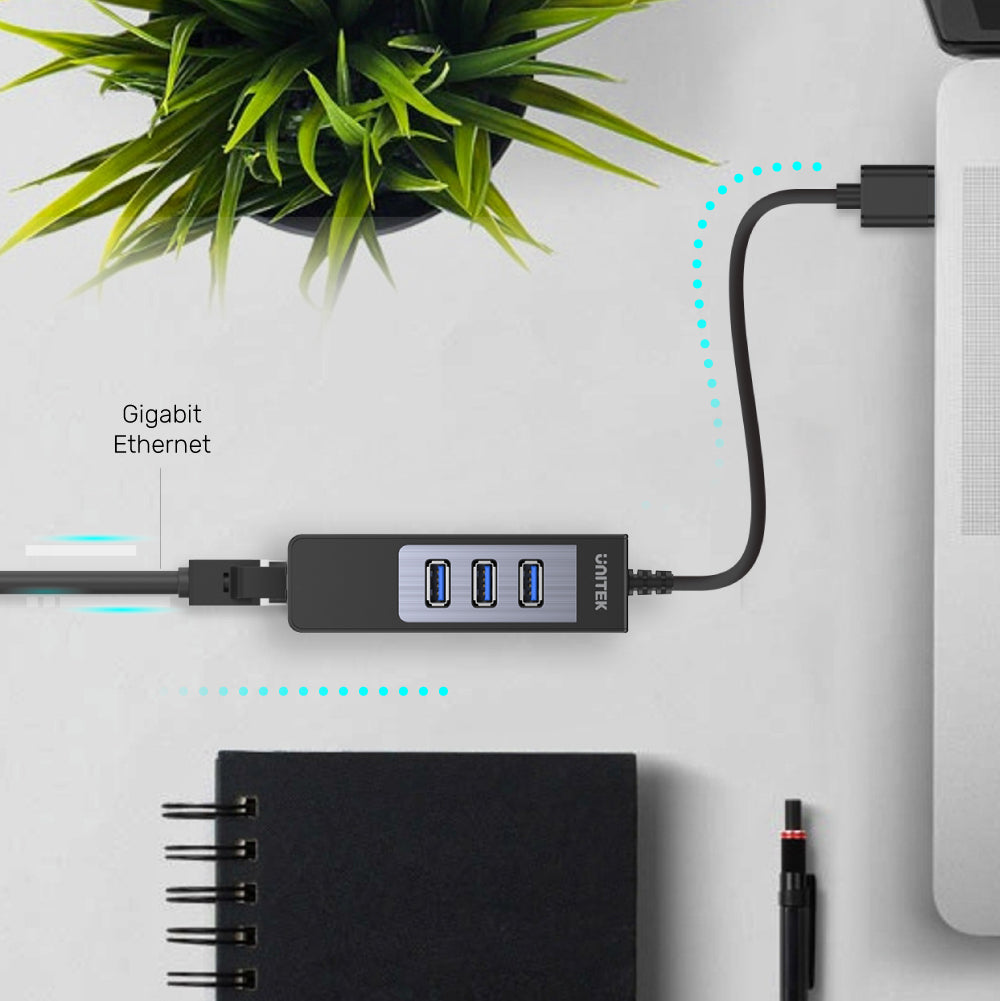
- USB3.0 ポートとギガビット イーサネット コンバーターとの完璧な組み合わせ。
- USB3.0仕様で、データ転送速度は最大5Gbps。
- USB2.0/1.1との下位互換性あり。
- ギガビット イーサネット コンバーターにより、高速で安定したインターネット接続を提供します。
- 外部電源から電力を引き出す必要のないバスパワー。
- プラグアンドプレイ、ホットスワップ可能
- 製品寸法: 110mm x 31mm x 20mm
- アップストリーム: 1 x USB3.0 Type-A オス
- ダウンストリーム: 3x USB3.0 Type-A メス、1 x RJ45 メス
- ケーブルの長さ / 外径: 30cm / 4.5mm
- 1 x USB 3.0 3 ポート ハブ + ギガビット イーサネット コンバーター
- 1×ユーザーマニュアル
送料はチェックアウト時に計算されます。国際関税と税金が適用される場合があり、チェックアウト時に計算されません。
出荷と配達
配送料が発生しない場合は、お問い合わせください。
通常の配送時間: 3 ~ 14 営業日
COVID-19 ガイドラインのため、最終発送日はお住まいの地域によって異なります。
遅延:
Unitek は、無関係な要因 (住所の誤り、天候、検査、労働争議、および/または輸送上の問題など) に起因する配送の遅延について責任を負いません。荷物の紛失や破損については責任を負いかねます。
関税および税金:
米国外に発送される注文には、仕向国によって課される輸入税、関税、手数料、および/または VAT (付加価値税) が課される場合があります。 UNITEKはこれらの料金を管理しておらず、それらが何であるかを予測できないため、政府から請求される税金、関税、通関手数料、および/またはVATを支払う責任はお客様にあります。税関のポリシーや関税に関する追加情報については、該当する管轄区域の現地の税関にお問い合わせください。海外からの注文は、輸入関税、税金、手数料の支払いを怠った場合、返金されません。
その他ご不明な点やお問い合わせは までお問い合わせください。
Please download the latest driver of this product. Reinstall the driver again (https://www.unitek-products.com/pages/drivers-hub) and if it still doesn't work, contact us via support@unitek-products.com
Go through the following:
1. Press the Windows Key plus R, type "devmgmt.msc", and press Enter.
2. In Device Manager, under the appropriate heading, confirm that your expansion card is listed and that there isn't an exclamation mark next to it. For example, a USB controller card would be under Universal Serial Bus controllers.
3. Your USB device is listed according to the name of the chipset or the dedicated name.
Go through the following:
1. Click the Apple icon.
2. Click About This Mac.
3. Click More Info or System Report.
4. Under the appropriate heading, please check that your USB device is listed (according to the name of the chipset or the dedicated name) and that there isn't an error. For example, a network card would be under Ethernet Cards.
5. You may have to refresh the System Information page after you plug in your device. To do so, press Command + R with the System Information page open.
It is best to set a specific speed at half or full duplex in your settings, while the device that the adapter is connected to (whether it is a router, switch, or computer) must also be able to perform at the same speed.
Note: You must log in as the local administrator before you continue.
To do so, go through the following:
1. Press Windows Key plus R.
2. Type "devmgmt.msc".
3. Click OK.
4. Open the Networking adapters section.
5. Right-click the network adapter that you want to change and select 6. Properties.
7. Click the Advanced tab.
8. Scroll down to Speed & Duplex. By default, it is set to Auto-Negotiate. Select any of the speeds that you see in the list.
9. Click OK and restart your computer.
Go through the following:
Windows 10
1. Press the Windows Key plus X.
2. Click Network Connections.
3. Right-click the connection that you want to change and click Properties.
Note: The IP address for a wired connection is called Local Area Connection or Ethernet. The IP address for a wireless connection is called Wireless Network Connection or Wireless.
4. Left-click Internet Protocol Version (TCP/IPv4) and click Properties.
5. Select the Use the following IP address option.
6. Enter your desired IP address and click in the Subnet Mask area, which should auto-complete.
7. Click OK twice to apply the settings.
Note: If you are changing your IP address to access a specific device, minimize the Network Connections window. Please be reminded, in step 7, select Obtain an IP address automatically to access the Internet again.
Windows 8
1. Press the Windows Key plus X.
2. Click Control Panel.
3. Click Network and Sharing Center.
4. Click Change adapter settings on the left.
5. Right-click the connection you want to change and choose Properties.
Note: If you are changing the IP address on a physical connection, it will be called “Local Area Connection” or “Ethernet”. If you are changing the IP address on a wireless connection, it will be called “Wireless Network Connection” or “Wireless”.
6. Left-click “Internet Protocol Version (TCP/IPv4)” to select, then click Properties.
7. Select the radio button "Use the following IP address".
8. Enter your desired IP address and click into the Subnet Mask area, which should auto-fill appropriately.
9. Click OK twice to apply the settings.
Note: If you are changing your IP address to access a specific device, minimize the Network Connections window. Please be reminded, in step 7, select Obtain an IP address automatically to access the Internet again.
Windows 7
1. Click Start, then select Control Panel.
2. Click Network and Internet.
3. Click Network and Sharing Center.
4. Click Change adapter settings on the left.
5. Right-click the connection you want to change and choose Properties.
Note: If you are changing the IP address on a physical connection, it will be called “Local Area Connection”. If you are changing the IP address on a wireless connection, it will be called “Wireless Network Connection”.
6. Left-click “Internet Protocol Version 4 (TCP/IPv4)” to select it, then click Properties.
7. Select the radio button "Use the following IP address".
8. Enter your desired IP address and click into the Subnet Mask area, which should auto-fill appropriately.
9. Click OK twice to apply the settings.
Note: If you are changing your IP address to access a specific device, minimize the Network Connections window. Please be reminded, in step 7, select Obtain an IP address automatically to access the Internet again.
Windows Vista
1. Click Start, then select Control Panel.
2. Click Network and Sharing Center.
3. Click Manage network connections on the left.
4. Right-click the connection you want to change and choose Properties.
Note: If you are changing the IP address on a physical connection, it will be called “Local Area Connection”. If you are changing the IP address on a wireless connection, it will be called “Wireless Network Connection”.
5. Left-click “Internet Protocol Version (TCP/IPv4)” to select it, then click Properties.
6. Select the radio button "Use the following IP address".
7. Enter your desired IP address and click into the Subnet Mask area, which should auto-fill appropriately.
8. Click OK twice to apply the settings.
Note: If you are changing your IP address to access a specific device, minimize the Network Connections window. Please be reminded, in step 6, select Obtain an IP address automatically to access the Internet again.
Windows XP
1. Click Start, then select Control Panel.
2. Click Network Connections.
3. Right-click the connection you want to change and choose Properties.
Note: If you are changing the IP address on a physical connection, it will be called “Local Area Connection”. If you are changing the IP address on a wireless connection, it will be called “Wireless Network Connection”.
4. In the middle of the Properties window, scroll down to "Internet Protocol (TCP/IP)" and left-click on it to select it, then click Properties.
5. Select the radio button "Use the following IP address".
6. Enter your desired IP address and click into the Subnet Mask area, which should auto-fill appropriately.
7. Click OK twice to apply the settings.
Note: If you are changing your IP address to access a specific device, minimize the Network Connections window. Please be reminded, in step 5, select Obtain an IP address automatically to access the Internet again.
Mac OS
1. Click the Apple menu.
2. Click System Preferences.
3. Click Network.
4. Select the network device that you would like to configure.
Note: The IP address for a wired connection is called Local Area Connection or Ethernet. The IP address for a wireless connection is called Wireless Network Connection or Wi-Fi.
5. Click Advanced.
6. Click TCP/IP.
7. Beside Configure IPv4, select Manually.
8. In the IPv4 Address field, enter your desired IP address.
9. In the Subnet Mask field, enter a default subnet address (for example, 255.255.255.0 for 192.168.xxx.xxx).
10. Do one of the following:
.Leave the Router field blank.
.Enter the IP address of the default gateway.
11. Click OK and Apply to apply the changes.
Note: If you are changing your IP address to access a specific device, minimize the Network window. Please be reminded, in step 7, select Using DHCP to access the Internet again.