
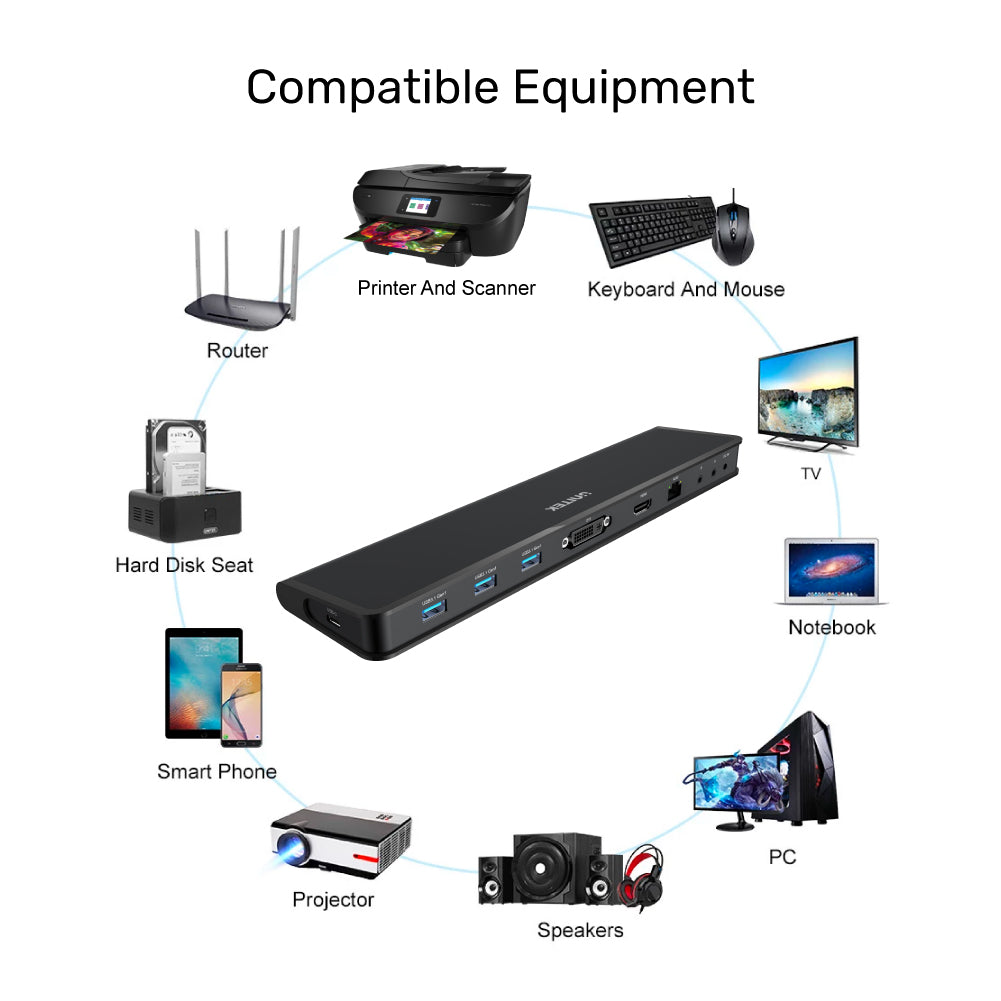
uHUB S7+ 8-in-1 Powered USB-C/A イーサネット ハブ、デュアル モニターおよび VGA アダプター付き
- ラップトップ ドッキング ステーション
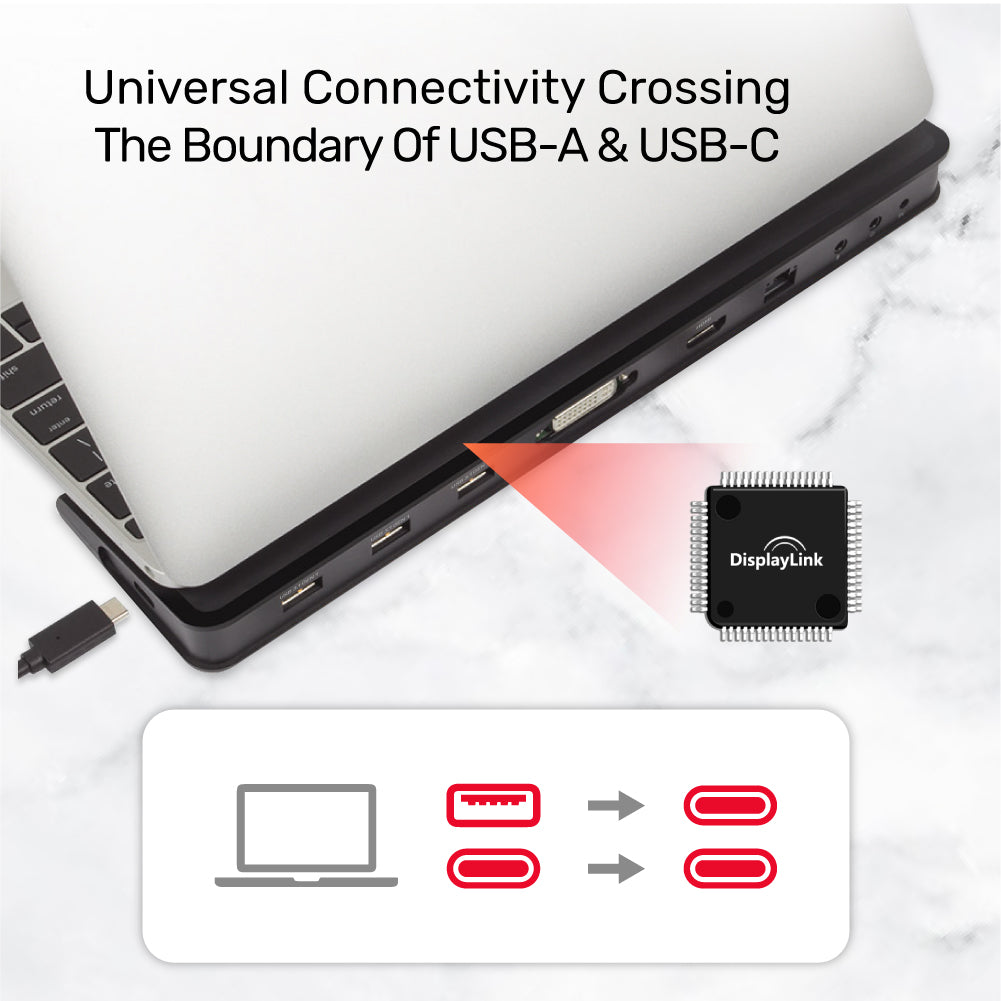
- USB-C & A アップストリーム対応
- USB 3.0 5Gbps スーパースピード
- デュアルディスプレイ出力
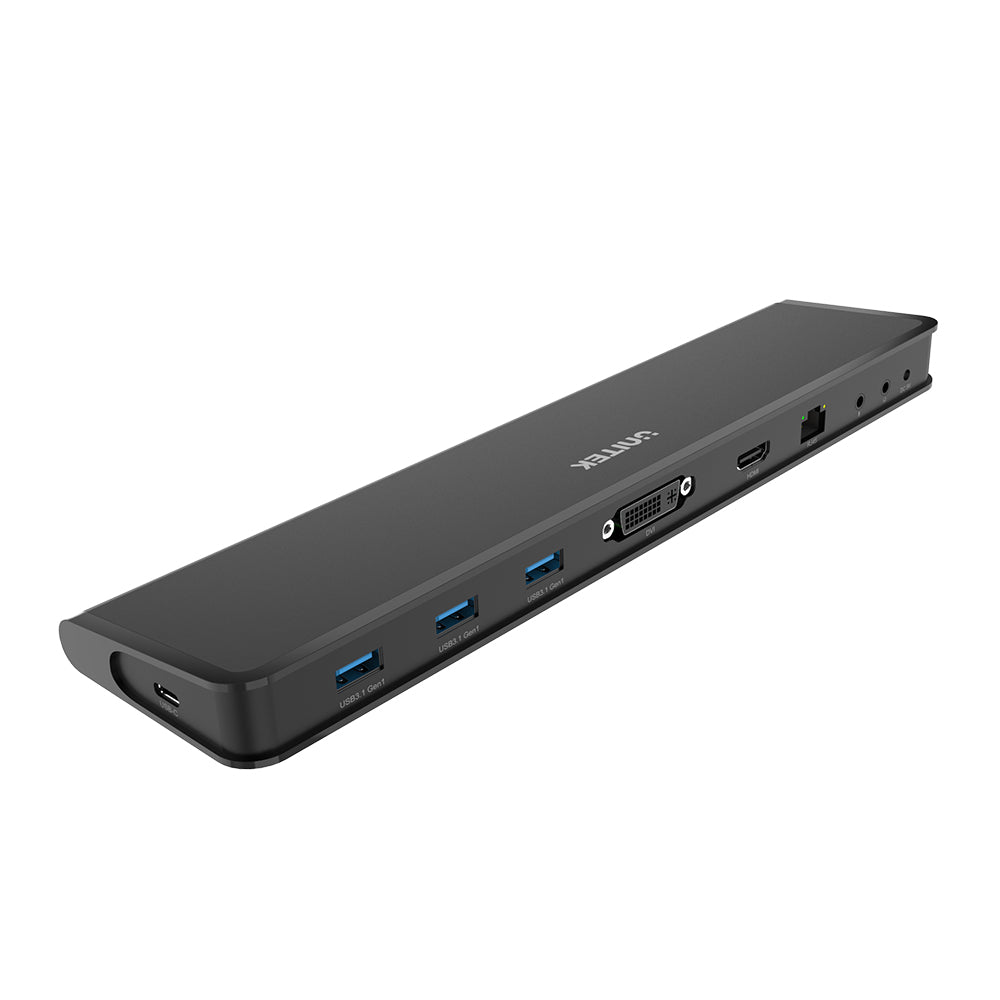
- この USB ドックは、USB-C および USB-A アップストリーム デバイスの両方と互換性があります。 3 つの USB 3.0 5Gbps ポート、デュアル ディスプレイ出力、ヘッドフォン、マイク オーディオ ポート、ギガビット イーサネット RJ45 ポートを 1 つのドッキング ステーションに組み合わせて、生産性を最大化します。
製品の特徴:
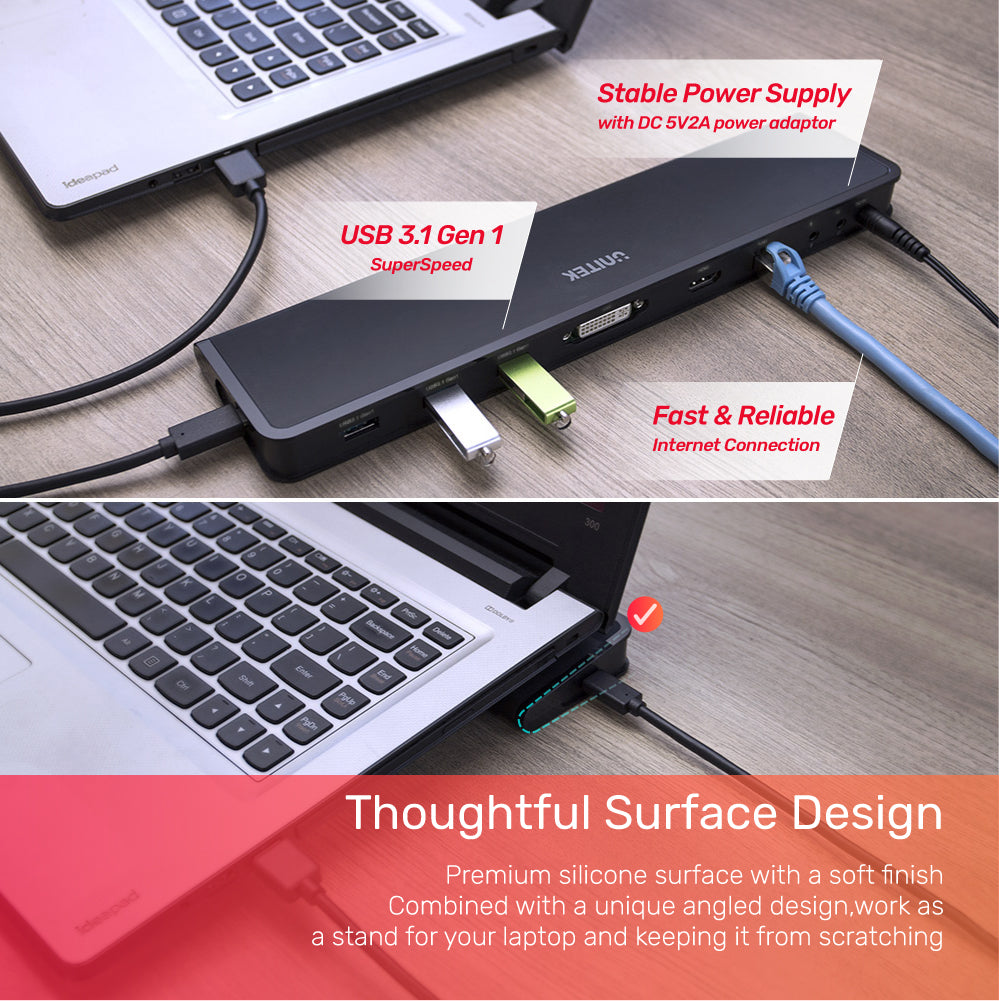
- トリプル USB-A 3.0 は、SuperSpeed 5Gbps のデータ転送速度をサポートします。 USB2.0/1.1との下位互換性
- ギガビット イーサネット スロットは、最大 1000 Mbps の安定したネットワーク接続を提供します
- 3.5mmオーディオおよびマイクジャックを装備
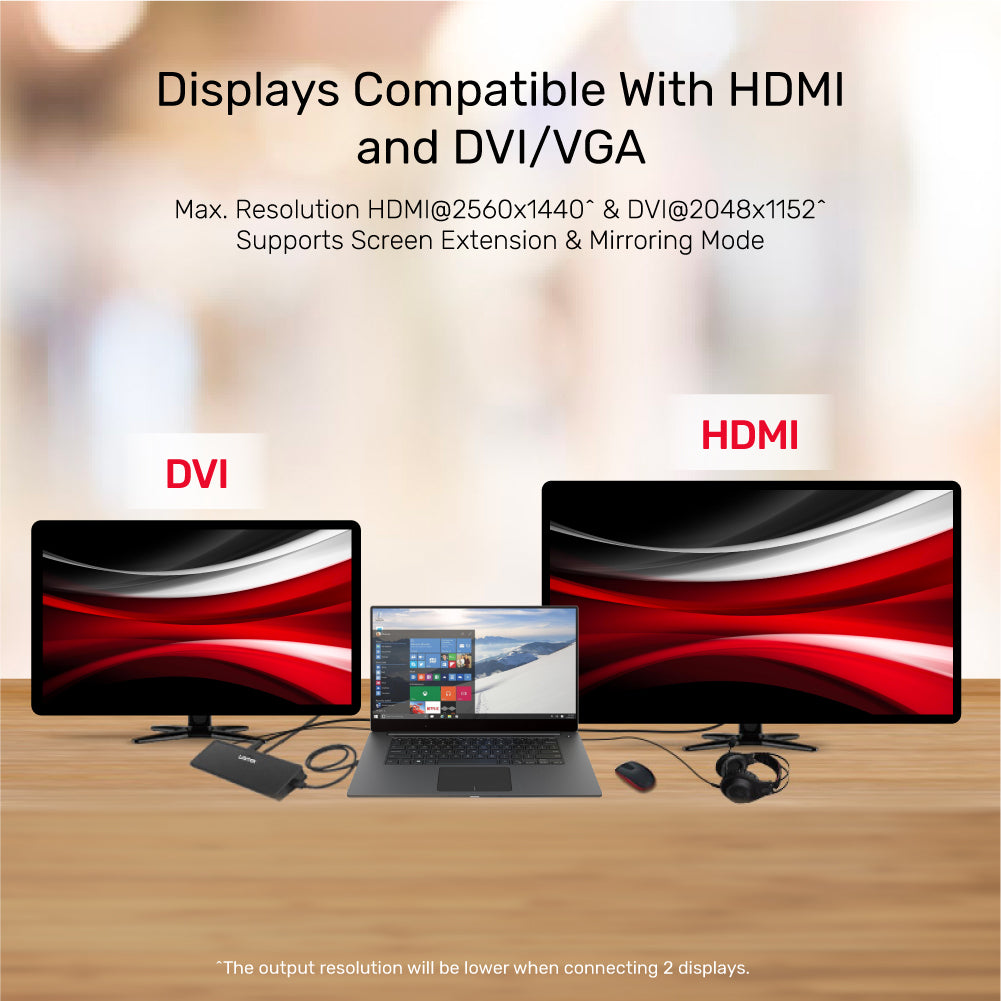
- 内蔵 HDMI および DVI-I (24+5) によるデュアル ビデオ モニター ディスプレイ接続
- DVI-to-VGA アダプターを使用すると、このドッキング ステーションは VGA モニターと互換性があります。
- このハブが 1 つのディスプレイに接続している場合、HDMI@2560 x 1440 および DVI@2048 x 1152 までの解像度をサポートします。
- 画面拡張モードと画面ミラーリングモードをサポート
- USB-C to A ケーブルと USB-C to C ケーブルが付属し、MacBook Pro、Acer TravelMate、Microsoft Surface/ Pro with USB-A または USB-C ポートなどと互換性があります。
- 安定した十分な電力を供給するためのDC 5V2A電源アダプターを同梱
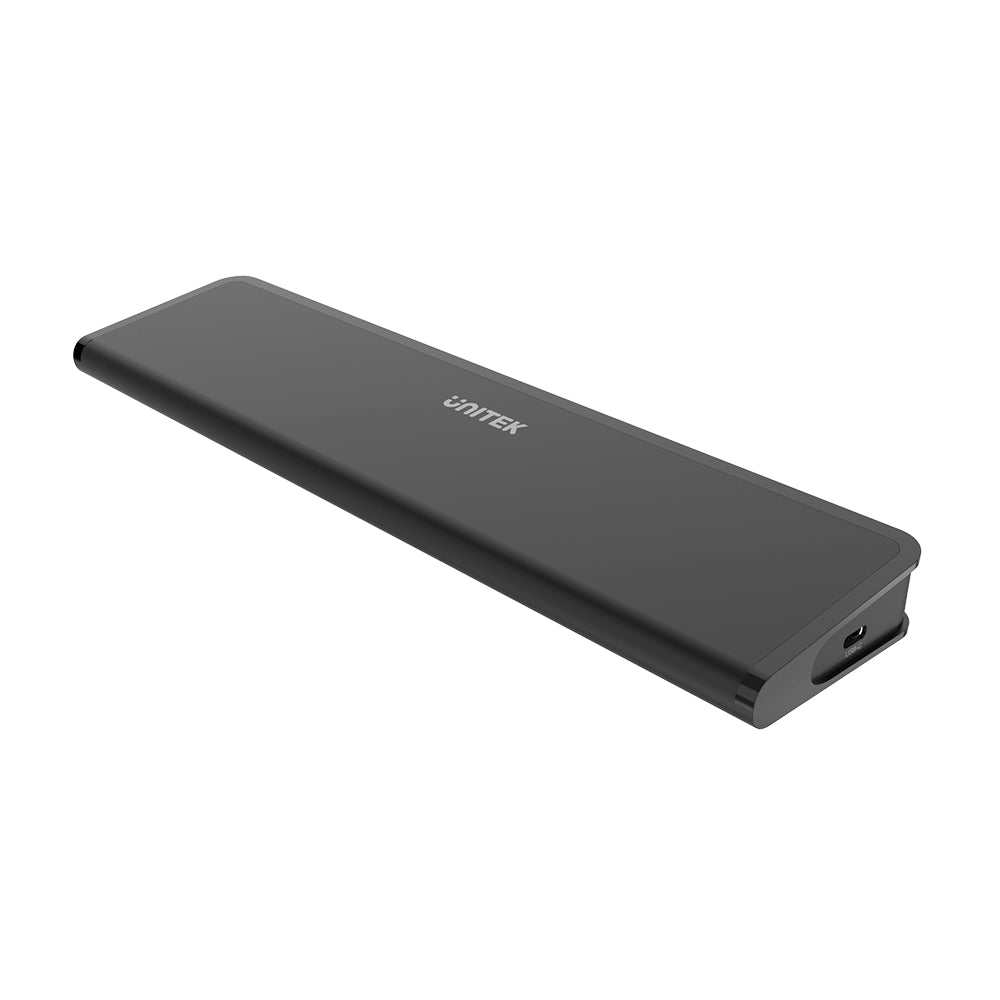
- このドッキング ステーションは、ラップトップのスタンドとして、傷から守るユニークな角度の付いたデザインで、ソフトな仕上げのプレミアム シリコンを採用しています。
ハードウェア & 寸法:
- 寸法: 280mm x 69mm x 23mm
- DCサイズ:3.5×1.35mm
- アップストリーム: 1 x USB-C メス
- 下流:
- 3×USB-Aメス、
- 1×DVI、
- 1×HDMI、
- 1×ギガビットイーサネットRJ45、
- 2 x 3.5mm オーディオ (ヘッドフォンとマイク用)
- 1×uHUB S7+
- 1×ユーザーマニュアル
- 1 x USB-C - USB-A 2 フィート ケーブル
- 1 x USB-C - USB-C 2 フィート ケーブル
- 1 x DVI-VGA アダプタ
- 1×DC 5V2A電源アダプター
- Triple USB-A 3.0 supports SuperSpeed 5Gbps data transfer speed. Backward compatible with USB2.0/1.1
- Gigabit Ethernet Slot provides stable network connection up to 1000 Mbps
- Equipped with 3.5mm audio and microphone jack
- Dual video monitor display connection through built-in HDMI and DVI-I (24+5)
- With a DVI-to-VGA adaptor, this docking station compatible with VGA monitor
- When this hub is connecting with a single display, it supports resolution up to: HDMI@2560 x 1440 and DVI@2048 x 1152. The resolution will be 1080P if total two displays are connecting with
- Supports Screen Extension Mode and Screen Mirroring Mode
- With a USB-C to A cable and a USB-C to C cable, compatible with MacBook Pro, Acer TravelMate, Microsoft Surface/ Pro with USB-A or USB-C Port and more
- Included a DC 5V2A power adaptor, for providing stable and sufficient power
- This docking station adopts premium silicone with a soft finish, with a unique angled design, as a stand for your laptop and keeping it from scratching
- Dimension: 280mm x 69mm x 23mm
- DC Size: 3.5*1.35 mm
- Upstream: 1 x USB-C Female
- Downstream:
- 3 x USB-A Female,
- 1 x DVI,
- 1 x HDMI,
- 1 x Gigabit Ethernet RJ45,
- 2 x 3.5mm Audio (for Headphone & Microphone)
- 1 x uHUB S7+
- 1 x User Manual
- 1 x USB-C to USB-A 2 Feet Cable
- 1 x USB-C to USB-C 2 Feet Cable
- 1 x DVI-to-VGA Adapter
- 1 x DC 5V2A Power Adapter
https://cdn.shopify.com/s/files/1/0100/4820/8960/files/D001A_User_Manual.pdf?v=1704347255https://cdn.shopify.com/s/files/1/0100/4820/8960/files/D001A_User_Manual.pdf?v=1704347255https://cdn.shopify.com/s/files/1/0100/4820/8960/files/D001A_User_Manual.pdf?v=1704347255Download
送料はチェックアウト時に計算されます。国際関税と税金が適用される場合があり、チェックアウト時に計算されません。
出荷と配達
配送料が発生しない場合は、お問い合わせください。
通常の配送時間: 3 ~ 14 営業日
COVID-19 ガイドラインのため、最終発送日はお住まいの地域によって異なります。
遅延:
Unitek は、無関係な要因 (住所の誤り、天候、検査、労働争議、および/または輸送上の問題など) に起因する配送の遅延について責任を負いません。荷物の紛失や破損については責任を負いかねます。
関税および税金:
米国外に発送される注文には、仕向国によって課される輸入税、関税、手数料、および/または VAT (付加価値税) が課される場合があります。 UNITEKはこれらの料金を管理しておらず、それらが何であるかを予測できないため、政府から請求される税金、関税、通関手数料、および/またはVATを支払う責任はお客様にあります。税関のポリシーや関税に関する追加情報については、該当する管轄区域の現地の税関にお問い合わせください。海外からの注文は、輸入関税、税金、手数料の支払いを怠った場合、返金されません。
その他ご不明な点やお問い合わせは までお問い合わせください。
Please download the latest driver of this product. Reinstall the driver again (https://www.unitek-products.com/pages/drivers-hub) and if it still doesn't work, contact us via support@unitek-products.com
macOS Catalina (10.15) may occur compatibility issues with products that use DisplayLink technology, such as USB Hub and Video Adapters, results in a blank screen.
To resolve this issue, please go through the following:
1. Update computer to the latest version of macOS 10.15
2. Permit the function of Screen Recording:
a. Firstly download and install the latest DisplayLink macOS release for 10.15 and reboot the system.
b. Open System Preferences > Security & Privacy > Privacy and click the Lock at the bottom to make changes. The system may require an authenticate of the changes by using your login details.
c. After that, tick the box next to DisplayLinkUserAgent.
d. Final step, click on the Lock again to save changes and click “Quit now” on the prompted message.
e. If you have any doubt regarding the abovementioned steps, please refer https://support.displaylink.com/knowledgebase/articles/1916602-macos-catalina-10-15-screen-recording-permission
3. Check if the DisplayLink KEXT is blocked and enable it
a. Click Apple Menu at the top left-hand corner, and choose “About This Mac” and then click “System Report”
b. Select “Extensions” under “Software” on the left pane, and look for “DisplayLinkDriver”.
c. If the “Loaded” column shows “No”, then it means the KEXT is being blocked and you have to enable the function.
d. During the driver installation final step, you might be prompted to enable the extensions. Open System Preferences > Security & Privacy > General and click the Lock at the bottom to make changes. The system may require an authenticate of the changes by using your login details.
e. You will see there is a new add "Allow" button within 30 minutes following the installation, please click it to allow.
f. The driver install will go through the remaining progress automatically.
g. Note: The option of “Allow” will be available for 30 minutes only in the Security & Privacy settings. If it is not allowed within that time frame, please restart the installation in order for macOS to grant the opportunity to allow it again. If you have any doubt regarding the abovementioned steps, please refer https://support.displaylink.com/knowledgebase/articles/1188004-macos-10-13-10-14-and-10-15-video-functionality
4. If the problem persists, try installing the DisplayLink Manager Application (https://support.displaylink.com/knowledgebase/articles/1932214-displaylink-manager-app-for-macos-introduction-in). Be sure to run the application after installation and select “Launch automatically after logging-in” for it to start automatically every time you log-in.
MacBook and Mac Mini using the Apple Silicon chip support only one single external display over the Thunderbolt 3 ports, even when connected to a Thunderbolt 3 hub or adapter with multiple video output. Turning off the laptop display or using clamshell mode does not change this.
Using a USB-C DisplayLink-based hub or video adapter may be an option to allow more than one external display with an Apple M1-based Mac device.
Note: this limitation does not affect Intel-based Macs with Thunderbolt 3.
Please try to find out if hardware acceleration is enabled on any of your software applications. The hardware acceleration function can result in poor resource management and limit the performance of your device. Try to disable the hardware acceleration function in the program(s) that were impacted and see if it can resolve the issue you encountered.
You may firstly disable one of the following series of steps depending on what software application(s) or operating system that you are running.
Internet Explorer 9 and later
Note: Earlier versions of Internet Explorer do not use hardware acceleration.
1. Click the Start button and open Control Panel.
2. Click Network and Internet.
3. Click Internet Options.
4. Click the Advanced tab.
5. Browse to the Accelerated graphics screen.
6. Select the Use software rendering instead of GPU rendering check box.
7. Click Apply.
8. Restart your computer.
Google Chrome
1. Open Google Chrome and click the Options icon (it has three horizontal lines on it).
2. Click Settings.
3. Click Show advanced settings.
4. Scroll to the bottom of the screen and clear the Use hardware acceleration when available check box.
5. Restart your web browser.
Microsoft Office 2013 / 2010
1. Open any program in Microsoft Office (for example, Microsoft Word).
2. Click the File tab.
3. In the menu on the left side of the screen, click Options.
4. Click Advanced.
5. Under Display, select the Disable hardware graphics acceleration check box.
6. Close and restart all of the Microsoft Office programs that you had open.
Windows 10 / 8
1. Press the Windows Key plus X.
2. Click Setting.
3. Click Personalization.
4. Select a high-contrast theme.
Windows 7 / Vista
1. Click the Start button and open Control Panel.
2. Click Personalization.
3. Select a non-Aero theme. Ideally, you should select a basic and high-contrast theme.
Windows XP
1. Click the Start button and open Control Panel.
2. Select Display.
3. Click the Settings tab.
4. Click Advanced.
5. Click the Troubleshooting tab.
6. Move the Hardware Acceleration slider to None.
7. Restart your computer.
In general, the error “Out of Range” means that the resolution being output by the video source is not compatible with the display. Check the maximum resolution of both video source and display, then try lowering the resolution to the common resolution see if that helps.
Go through the following:
1. Check that the display’s video port works with another source.
2. Check that the cables between the source and the destination work with other equipment.
3. Check if a shorter cable works.
4. Check whether the video adapter is directional, whether it is active or passive.
5. Check if the display is on the correct signal channel (e.g. HDMI 1 or 2).
Go through the following:
1. Press the Windows Key plus R at the same time, type ”desk.cpl”, and press Enter.
2. Under the “Multiple Displays” selection, select “Extend these displays”
3. Press “Identify” to identify the number each display is assigned to.
4. Drag and drop each display accordingly to your setup.
5. Click the Apply button.
Go through the following:
1. Navigate to Apple Menu > System Preferences, click Displays, then click Arrangement.
2. Make sure that the “Mirror Displays” tick box is not selected.
3. Click on each display to identify the number each display is assigned to.
4. Drag and drop each display accordingly to your setup.
DisplayLink is not compatible with macOS 10.13.4 - 10.13.6. Please upgrade to macOS 10.14 (Mojave) to try to restore DisplayLink functionality.
At this time, the DisplayLink compatibility issue also affects any 2018 MacBook Pro with an Intel Coffee Lake CPU running macOS 10.14. Please see the DisplayLink website(https://www.displaylink.com/downloads/macos ) for a driver download workaround. This workaround will force AirPlay to extend or mirror one display.
There are some quick checks if you are trying to troubleshoot issues with a hub.
You may test the connected devices to make sure that the following components are working correctly and are not the source of the issue:
• Video cable
• Video source
• Video destination
• USB peripherals
• Ethernet peripherals
Try the following methods to test your video setup components:
• Use the video cable, video source, and another video destination (display) to setup to see if the problem is with the components.
• Use a different HDMI cable, video source, and the original video destination in your setup to see if the problem persists.
Ideally, you should test a component that you know works in another setup. Otherwise, the issue might happen because of the port function of your video source, or a driver issue.
When you test the video setup components, it is recommended that you do the following:
• Investigate that the source resolution matches the capabilities of the video destination. For example, if the video destination is only capable of 720p, then the video source cannot output 1080p, as that exceeds the capabilities of the video destination.
• Test at a lower resolution, for example, 1024 x 768.
• If you are using 4K resolutions, test with a shorter cable and test each of them individually.
If you are experiencing issues with audio over HDMI, investigate the following:
• The output audio over HDMI setting on the source.
• The compatible audio format on the destination and the source file format on the source.
• The destination's volume was raised.
• Take out the 3.5mm device if it is connecting to the hub.
• Note: HDMI to DVI/VGA cables, adapters and converters do not support audio.
When you test the peripherals, it is recommended that you do the following:
• Press the Windows Key plus R at the same time, type “devmgmt.msc”, and press Enter to open Device Manager.
• If you do not see the peripherals in Device Manager, please try to install the driver of your peripherals or I/O cards.
• If the device is listed with an error, reinstall the drivers following the instructions on the user manual.
• Check to see if your drivers are the latest. It is recommended that you go directly to the manufacturer's website to check for the latest drivers.
Note: The best way to try the new DisplayLink Manager app on macOS 10.15 or above is to firstly uninstall current DisplayLink Software (if any) and then install the new DisplayLink Manager app. Otherwise, the application may be unable to work, which the notification could be seen via system notification and in the application.
To install the DisplayLink Manager app, please follow these steps:
1. Download the latest driver at step 1 at https://support.displaylink.com/knowledgebase/articles/1932214-displaylink-manager-app-for-macos-introduction-in#install
2. Connect the USB hub to both your Mac and the external display
3. Follow Steps 4 to 4.10 at https://support.displaylink.com/knowledgebase/articles/1932214-displaylink-manager-app-for-macos-introduction-in#install
If the connection of displays still does not work, please review the following:
• Ensure you have completed Steps 4.4 to 4.9 in the linked article, which includes running the application after the installation and selecting “Launch automatically after logging-in”, which ensures it starts automatically every time you log in.
• For Apple M1-based Macs, you may be required to install Rosetta during the DisplayLink install process due to the translation need of an app for use with Apple silicon.
Regarding clamshell and rotation mode on macOS Big Sur 11:
You may refer https://support.displaylink.com/knowledgebase/articles/1963276-clamshell-and-rotation-support-on-macos-big-sur-11 for the latest information.
Note: Do not physically connect the USB Hub to your devices until you have processed to Step6.
1. Download the latest driver from the UNITEK website (https://www.unitek-products.com/pages/drivers). You can find the product number on the back of product’s packaging under the barcode.
2. In general, Windows will save the files to the Downloads folder associated with your user account (for example, hard_drive_name\Users\your_name\Downloads).
3. Please select the appropriate folder for your operating system and double click “DisplayLink USB Graphics Software” .dmg file.
4. Follow the on-screen prompts to install the driver. Restart the computer either when prompted, or when the installer disappears.
5. Connect any video cables from your display(s) to the video port(s) on the hub.
6. Once Mac OS X has restarted, connect the hub to your computer.
7. Your computer will automatically complete the driver installation.
Note: Installation may take several seconds to complete. During the installation your display might flicker. This is normal.
Once the installation is completed, you will see your Windows desktop mirrored or extended to the additional monitor(s). You can select the Mirror Mode or Extend Mode by the tick box in the System Preferences (Apple Menu > System Preferences > Displays > Arrangement.).
Note: Do not physically connect the USB Hub to your devices until you have processed to Step 6.
1. Download the latest driver from the UNITEK website (https://www.unitek-products.com/pages/drivers). You can find the product number on the back of product’s packaging under the barcode.
2. In general, Windows will save the files to the Downloads folder associated with your user account (for example, C:\Users\your_name\Downloads).
3. Please select the appropriate folder for your operating system and double click “DisplayLink USB Graphics Software” .exe file.
4. Follow the on-screen prompts to install the driver. Restart the computer either when prompted, or when the installer disappears.
5. Connect any video cables from your display(s) to the video port(s) on the hub.
6. Once Windows has restarted, connect the hub to your computer.
7. Your computer will automatically complete the driver installation.
Note: Installation may take several seconds to complete. During the installation your display might flicker. This is normal.
Once the installation is completed, you will see your Windows desktop mirrored or extended to the additional monitor(s). You can select the Mirror Mode or Extend Mode in the Settings by pressing the Windows Key plus R at the same time, type “devmgmt.msc”, and press Enter to open Device Manager.
macOS intensifies the security policies and makes them stricter than previous versions. The original setting restricts the software not from App Store and requests to update the Security and Privacy settings in order to process.
To install the driver, please follow the following steps once you on your Mac device:
1. Open System Preferences and then Security & Privacy.
2. Click the Lock button near the bottom of the General tab to unlock. The system may require an authenticate of the changes by using your login details.
3. Choose “App Store and identified developers” under “Allow apps downloaded from:”
4. Then conduct the installation of the downloaded driver.
5. macOS will remind you to allow the software when the installation nearly completes.
6. Open System Preferences and then Security & Privacy. You will see there is a new add "Allow" button, please click it to allow.
7. The driver install will go through the remaining progress automatically.
Note: The option of “Allow” will be available for 30 minutes only in the Security & Privacy settings. If it is not allowed within that time frame, please restart the installation in order for macOS to grant the opportunity to allow it again.